

The Parts You Can See in the Photo
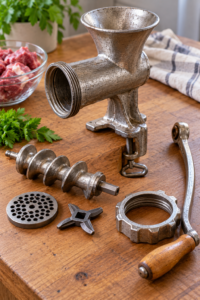
Understanding the visible parts makes it easier to identify the object and inspect it.
Hopper
The flared opening on top receives the food. Pieces are fed down from here toward the internal spiral shaft. The 5 visible on the hopper is a marking on this example; without documentation for the specific model, it is best to describe it as a size or model marking rather than assigning it a more precise meaning.
Main body
The long horizontal housing contains the mechanism that moves food forward. The raised ELMA lettering appears on its side. Cast markings are useful clues when researching an old kitchen tool, especially if you can also photograph any writing on the underside, handle, front ring, or internal parts.
Crank and wooden grip
The handle turns the shaft inside the body. Its wooden grip makes the repeated turning motion more comfortable. On an older grinder, check whether the handle is securely attached and whether it rotates without excessive wobbling or scraping.
Front retaining ring
The round fitting at the output end holds the cutting components in place. Depending on the design, a blade and perforated plate sit behind it. A photograph of the assembled outside cannot confirm whether either component is still inside.
Table clamp
The C-shaped section below the body hooks over a table or counter edge. Turning its screw presses the clamp against the underside of that surface. A stable clamp is important: the grinder should not shift or tip as the crank turns.
These parts explain the purpose of the vintage meat grinder at a glance. They do not, by themselves, tell us whether it is safe to prepare food with today.
How Does a Hand-Cranked Meat Grinder Work?
First, the grinder is clamped securely to an appropriate work surface. Food placed in the hopper drops toward the rotating spiral shaft inside the horizontal body. As the user turns the crank, that shaft pushes the food forward.
Near the front, a cutting blade rotates against a stationary perforated plate. The blade cuts the food as it is pushed through the plate’s holes. The size of those holes affects how coarse or fine the mince appears. A plate with larger openings generally produces a coarser result than one with smaller openings.
Several parts must fit and meet properly. A dull blade, damaged plate, loose front ring, or incorrectly assembled mechanism can make grinding difficult or produce a smeared texture. If a machine is missing parts, simply turning its handle may move food forward without mincing it correctly.
A vintage meat grinder should be examined and assembled according to documentation for its actual model wherever that information is available. Do not assume that a blade or plate from a different grinder will fit safely just because it looks similar in a photograph.
What Could It Be Used For?
The primary purpose of this type of grinder is to mince meat. Depending on the model, its condition, and the parts fitted, a manual grinder may also process certain other foods. Older grinders have been used in different kitchens for a variety of mixtures, but compatibility varies.
For meatballs or burgers, the grinder can prepare meat for seasoning and shaping. For homemade sausages, grinding is one stage of the process; stuffing generally requires additional suitable equipment or attachments. The pictured grinder does not visibly establish that a sausage-stuffing attachment is included.
A food grinder can sometimes help with cooked or non-meat ingredients, but do not assume every food is appropriate for an old machine. Hard pieces may strain the mechanism, while stringy ingredients can wrap around the shaft or blade. If you have identified the exact model, a manufacturer’s instruction sheet is the most useful guide to its intended applications.
If the grinder is being kept as a display item, it has another clear use: showing how a familiar food preparation task was done by hand. Its shape communicates the process remarkably well even without a demonstration.