
Introduction
Homemade pita bread is one of the simplest, softest, and most versatile breads you can prepare in your kitchen. Known as Arabic bread or pocket bread, this Middle Eastern staple has become incredibly popular around the world thanks to its light, fluffy texture and signature hollow pocket that forms during baking.
Pita bread is one of the oldest and most iconic breads in Middle Eastern cuisine, a staple that has found its place in kitchens across the world thanks to its light texture, delicious flavor, and incredible versatility. Whether you know it as “pita,” “Arabic bread,” “khobz,” or simply “pocket bread,” its unique shape and airy interior make it perfect for stuffing, dipping, wrapping, and serving with almost any dish.
Making pita bread at home is far easier than most people believe. With just flour, yeast, water, and a bit of patience, you can create soft, fluffy pitas that puff beautifully in the oven — forming that famous hollow pocket you can fill with your favorite ingredients. The best part? Homemade pita is fresher, healthier, and far more flavorful than anything you buy in a plastic packet.
In this complete and deeply detailed guide, you’ll discover not only how to prepare perfect homemade pita bread but also the secrets behind the puffing process, the science of dough elasticity, multiple variations, storage tips, and answers to the most common questions bakers face.
By the end of this article, you’ll be able to prepare bakery-style pita bread in your own kitchen, even if it’s your very first time. Ready? Let’s begin!
Ingredients
-
To make soft, fluffy, perfectly puffed pita bread, you only need a few basics:
-
500 g all-purpose flour (about 3 ½ cups)
-
300 ml warm water
-
1 teaspoon active dry yeast
-
1 teaspoon salt
-
1 teaspoon sugar
-
2 tablespoons olive oil
These ingredients come together beautifully to create a dough that is elastic, easy to handle, and perfect for high-temperature baking — the key to achieving that iconic puff.
-
Preparation Steps
-
1. Activate the Yeast
In a large mixing bowl, combine the warm water, sugar, and active dry yeast. Stir gently and let the mixture rest for 5 to 10 minutes.
You’ll notice bubbles and foam forming on the surface, which indicates that the yeast is active and ready to work.
✔ This step is essential for light and airy bread.2. Form the Dough
Add the flour and salt to the yeast mixture and begin mixing. Once the dough starts to come together, add the olive oil and continue mixing until a rough dough forms.
3. Knead the Dough
Transfer the dough onto a lightly floured table. Knead for 5–7 minutes using the palms of your hands, folding the dough over itself.
The dough should become smooth, elastic, and slightly soft.
✔ If the dough sticks too much, sprinkle a small amount of flour — but not too much, or the pitas won’t puff.4. First Rise
Shape the dough into a smooth ball, place it in a lightly oiled bowl, and cover it with a damp towel.
Let it rest in a warm place until it doubles in size — this usually takes about 1 hour.5. Preheat the Oven
Turn the oven to 230°C (450°F) and place a baking sheet inside while it preheats.
A high temperature and hot tray are crucial for helping the pitas puff properly.
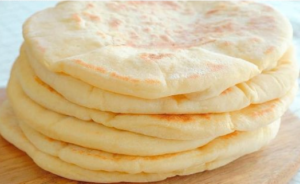
Homemade pita bread rising beautifully as it cooks on a hot surface.
-
6. Shape the Pitas
Once the dough has risen, punch out the air and divide it into small balls the size of a golf ball.
Roll each ball into a thin circle, around 15 cm wide.
✔ Make sure the circles are evenly rolled — uneven dough won’t puff.7. Bake the Pitas
Carefully remove the hot baking sheet, place the dough discs on top, and return it to the oven immediately.
Bake for 3–4 minutes until the pitas inflate like balloons.
The moment of puffing is magical — and a clear sign you’ve done everything right.8. Cool and Serve
Remove the pitas from the oven and allow them to cool slightly.
They will naturally deflate a bit, but the pocket inside remains intact.Now they’re ready to fill, dip, or enjoy warm with your favorite meals.
Why You’ll Love This Recipe
-
1. Easy Ingredients, No Special Equipment
You don’t need a mixer or fancy tools — only flour, yeast, and your hands.
2. Soft, Fluffy Texture
Homemade pita is softer and more fragrant than store-bought versions with preservatives.
3. Perfect for Sandwiches and Wraps
The interior pocket makes it ideal for shawarma, falafel, kofta, grilled chicken, or veggie fillings.
4. Ready in Less Than an Hour
Most of the time is just waiting for the dough to rise.
5. Healthier and Fresher
No chemicals, no artificial flavors — just real homemade goodness.
6. Budget-Friendly
Making pita at home costs far less than buying it at the store.
7. Beginner-Friendly Recipe
Even if you’ve never baked bread before, this recipe guarantees success.
https://quickyyourrecipes.com/vanilla-yogurt-cake-recipe/
Tips for Perfect Pita Every Time
✔ Keep the Dough Soft
A slightly sticky dough leads to better puffing.
✔ Roll Evenly
If one side is thicker, the pita won’t puff properly.
✔ A Hot Oven = Guaranteed Puff
230°C or higher is essential.
✔ Avoid Opening the Oven Early
Heat loss prevents puffing.
✔ Don’t Overbake
3–4 minutes is enough. Overbaking makes pitas dry and brittle.
Delicious Variations to Try
🌾 Whole Wheat Pita
Replace 40% of the flour with whole wheat flour for extra fiber.
🧄 Garlic and Herb Pita
Add garlic powder, thyme, oregano, or za’atar to the dough.
🥛 Yogurt Pita
A spoon of yogurt creates an ultra-soft dough.
🧈 Butter-Brushed Pita
Brush the hot pitas with melted butter for a rich flavor.
How to Use Pita Bread
Pita bread goes with almost everything:
-
Shawarma chicken or beef
-
Falafel wraps
-
Hummus and baba ganoush
-
Grilled vegetables
-
Soups and salads
-
Breakfast sandwiches
-
Tuna, turkey, or veggie wraps
-
Fresh cheese and herbs
Its pocket makes it perfect for stuffing, while its soft round shape makes it great for dipping.
FAQ
❓ Why didn’t my pita puff?
Usually because the oven wasn’t hot enough, or the dough was rolled too thick or too unevenly.
❓ Can I cook pita on a stovetop?
Yes! Use a hot cast-iron skillet on medium-high heat. They puff just as beautifully.
❓ How do I store homemade pita bread?
Place in an airtight bag for up to 3 days, or freeze for 2–3 months.
❓ Can I make the dough ahead of time?
Absolutely — refrigerate overnight and bake the next day.
Storage Tips
✔ At Room Temperature
Store in an airtight bag for up to 3 days.
✔ In the Freezer
Wrap tightly and freeze for up to 3 months.
✔ Reheat
Warm in the oven or on a hot pan for 1 minute to restore softness.
External Link
For more Middle Eastern bread inspiration:
https://www.kingarthurbaking.com/recipes/pita-bread-recipe