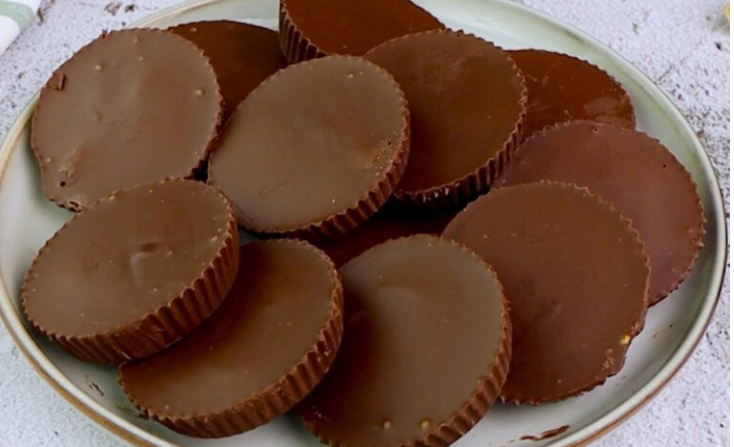
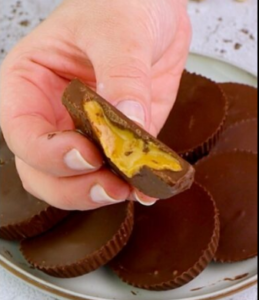
No Bake Chocolate Peanut Butter Cups: 7 Delicious Reasons to Love This Easy Recipe
If you’re craving a dessert that combines creamy peanut butter and silky chocolate into one irresistible bite, this chocolate peanut butter cups recipe is exactly what you need. With only three simple ingredients and no baking required, these homemade cups taste even better than store-bought versions. They offer a perfect balance of sweetness, richness, and smooth texture — all wrapped inside a melt-in-your-mouth chocolate shell.
This recipe is ideal for busy days, last-minute guests, dessert cravings, or even gifting. Whether you’re a beginner or an expert in the kitchen, making these peanut butter cups is quick, fun, and absolutely satisfying.
⭐ Ingredients for hocolate peanut butter cups recipe
For the chocolate layer
-
200 g dark chocolate (or semi-sweet chocolate)
-
Paper cupcake molds or silicone molds
For the peanut butter filling
-
100 g creamy peanut butter
-
2 tablespoons powdered sugar (optional for extra sweetness)
⭐ Preparation Steps
1. Melt the Chocolate
-
Break the chocolate into small pieces.
-
Melt it in a bain-marie (double boiler) or microwave:
-
Microwave method: heat in 30-second intervals, stirring each time, until smooth.
-
-
Set aside but keep the chocolate warm and liquid.
Continue to next page
2. Prepare the Peanut Butter Filling
-
Add the peanut butter to a bowl.
-
Add powdered sugar if you prefer a sweeter filling.
-
Mix until creamy and smooth.
⭐ 3. Assemble the Cups – Layering Step
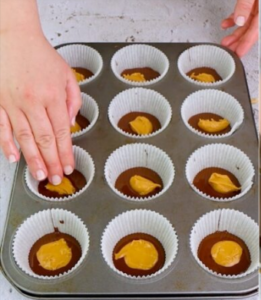
This step matches the preparation photos you sent.
-
Place paper cupcake liners into a muffin tray.
-
Add one teaspoon of melted chocolate into each liner.
-
Tilt or swirl the tray gently so the chocolate coats the bottom.
-
Refrigerate for a few minutes until slightly firm.
-
Add one teaspoon of peanut butter into the center of each cup, leaving some space around the edges.
-
Cover the peanut butter completely with another teaspoon of melted chocolate.
-
Tap the tray lightly to smooth the surface and remove air bubbles.
-
Refrigerate for 30 minutes or until fully hardened.
⭐ Tips & Variations
✔️ Use white chocolate
Create white chocolate peanut butter cups for a sweeter flavor.
✔️ Add texture
Mix crushed nuts into the peanut butter for a crunchy center.
✔️ Add sea salt
Sprinkle sea salt on top before refrigerating for a gourmet touch.
✔️ Try flavored peanut butter
Honey peanut butter, crunchy peanut butter, or almond butter work perfectly.
✔️ Add caramel
Place a small drop of caramel over the peanut butter before adding the final chocolate layer.
https://quickyyourrecipes.com/no-bake-caramel-cheesecake-recipe/
Continue to next page
⭐ Why You’ll Love This Recipe
This chocolate peanut butter cups recipe is:
• Quick — only 3 ingredients
• No bake — ready in minutes
• Creamy and rich
• Kid-friendly
• Perfect for parties or gifting
• Budget-friendly
• Customizable to your taste
You’ll come back to it again and again!
⭐ Motivational Conclusion
With just a few simple ingredients, you can create a batch of rich, creamy, indulgent chocolate peanut butter cups that taste like they came straight from a gourmet shop. They’re effortless, beginner-friendly, and guaranteed to impress anyone who tries them. Once you make them at home, you’ll never want to buy packaged peanut butter cups again.
So go ahead — melt that chocolate, scoop that peanut butter, and treat yourself to pure delight. You deserve it!
⭐ FAQ – Frequently Asked Questions
1. Can I store chocolate peanut butter cups?
Yes! Keep them refrigerated for up to 7 days.
2. Can I freeze them?
Absolutely — freeze for up to 2 months. Thaw before eating.
3. Can I use milk chocolate instead of dark chocolate?
Yes, any chocolate type works perfectly.
4. Can I make them sugar-free?
Use sugar-free chocolate and natural unsweetened peanut butter.
5. Why did my chocolate crack?
It often happens if the chocolate layer is too thin. Add a slightly thicker layer.
For more no-bake chocolate desserts, visit:
https://www.allrecipes.com/recipes/17462/desserts/chocolate/no-bake/